Setting up this blog
Back in May I was laid off from my dream job. Like so many other out-of-work tech workers I’m still trying to find my next career opportunity. I’ve also had a less-than-traditional career progression which makes it a bit harder to meet many of the qualifications of the roles I’m interested in. I knew I had to switch up my approach, but I really wasn’t sure how. After chatting with some friends I decided to create this blog.
I’ve tried blogging in the past and I always cringe when I look back at the content I’ve created. I’m not a particularly good writer and it can be a challenge to come up with interesting content. But on the flipside I want to share what I’m learning, and since I’m learning so much there’s potentially a ton of content to share. So here we go!
Tech choices
- Jekyll
- Minima theme
- Github pages
It’s a pretty short list but this is all intentional. I kept the following criteria in mind to make these choices:
- Relatively easy to set up
- Free (or as low cost as possible)
- Few design decisions to make
Why these criteria…
- I’m unemployed at the moment so saving money is a priority
- Github Pages is free for all Github users
- I’m familiar with Github so there was practically nothing to learn
- I’m familiar with Jekyll (because we used it for documentation at my last job)
- Jekyll is easy to setup
- Support for Jekyll is easy to find
- Less design decisions means less design distractions for me
Setting up Jekyll w/ Github Pages
I’m going to try my best to be as succinct as possible. Here are the steps I took:
Step 1: Creating a Github Pages repo
I followed the Quickstart guide for Github Pages.
Step 6 of their quickstart guide tells you to “…select a publishing source”. I knew I wanted to use the root of my repo. This is how that setting looks for me…
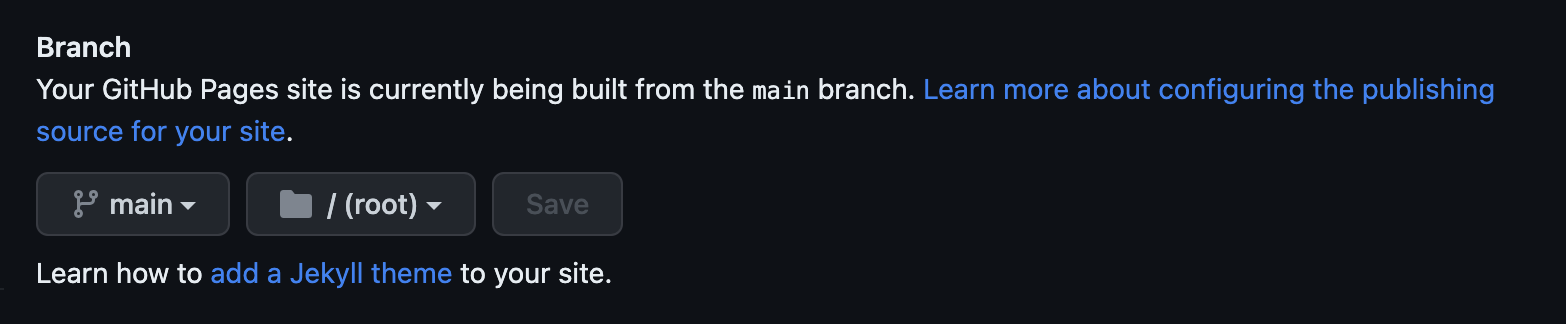
The pages settings include a field for a custom domain. I’m trying to keep things as simple as possible, so I skipped this part.
I stopped at step 8 of “Creating your website” so I could setup my Jekyll blog.
Step 2: Setting up my local repo
I set up the local version of my Github pages repo. In my terminal I entered git clone and the URL for my repo (Code > “Local” tab, https url).
Step 3: Installing Jekyll
To set up Jekyll I followed the Jekyll docs.
I ran into a couple of snags, which you can read about here.
Step 3b: Moving the Jekyll files
During installation Jekyll creates a new folder (I forgot Jekyll does this 🤦♀️).
I moved the files from the Jekyll created folder, into the root of my local repo using mv * ../ and mv .* ../ (that last one copies the hidden files).
Then I simply deleted the Jekyll folder with rm -rf foldername.
Step 4: Basic blog customizations
I’ll keep this brief since customizations are…well…custom.
To find the names of individual elements you can use the inspect tool in your browser, or you can view the minima.scss file in the gem folder1. I added the CSS customizations to my main.scss file.
Changes for things like my site title, github username, etc are made in the _config.yml file. Most of the information I needed about these customizations was found in the comments within the file itself.
Additional information about what customizations can be made in the _config.yml file, can be found here.
Step 6: Adding a search feature
This step was a bit more involved so please bear with me…
Jekyll themes do not come with a search feature. Since I’m writing about a lot of different tech topics, a search would be an important feature to add.
I looked at a few different options like plugins, Algolia and just using a plain Google search. I vetoed all of these because they’re either deprecated or serve distracting ads along with the search results. My only option left was adding a DIY search, which meant using Javascript. 🫠
Here’s the thing… Javascript is not my friend. I have been (inconsistently) trying to learn it since about 2001 but there’s so much to it, and it’s so complex. I know just enough to tweak Javascript when I need to, but otherwise I avoid it like the plague.
Instead of trying to roll my own search script I asked ChatGPT to generate one. I know ChatGPT is not always secure and it doesn’t always follow best practices, so I knew I’d have to confirm whatever it generated would work for me. Justin (my husband) knows way more Javascript than I do, so I asked him to take a look at it. Once he gave me the thumbs-up I made a few more tweaks based on these blog posts.
Here’s a breakdown of the changes made to add the search feature, complete with links to my code:
- Create a new search.md file. Jekyll will use this to create the search page.
- Created the _includes folder in my local repo, and within that created a search.html partial which I would add to a new layout file.
- Created the _layouts folder in my local repo and copied the page.html file from the gem to the _layouts folder in my local repo. Then I edited the page.html file to include an if-statement to check the page title, and add the search field if the conditions were met. Otherwise it just loads the standard pages content.
- The search needs an index to cross reference for posts. ChatGPT created a basic search.json file for me which I edited to include additional content like the date and the post excerpt.
- Then I added the javascript script to the assets folder, which does the actual searching.
- Finally I knew I wanted a search icon in the navigation, but this was a bit involved and probably wasn’t necessary. You’ll find the details, here.
Step 7: Improving security
Turns out there’s not much I could do, or needed to do. My blog is a static site and I’m not handling sensitive data which significantly reduces security risks.
Additionally, hosting on Github Pages makes it hard to add proper security headers. You can read more about security headers, here.
In the end adding meta tags in the head.html file (which was copied from the gem) was the best (free) option. You can view the meta tags, here.
Step 8: Improving accessibility
I wanted to ensure my blog met accessibility guidelines wherever it was possible.
Justin is a Product Designer so I asked him for some resources to test my blog. He recommended I use the AccessScan tool found here to check overall accessibility criteria, and the Contrast Checker tool here.
The AccessScan tool suggested a few changes like adding “role” attributes to certain elements, and ensuring I was consistent in my header tags.
The Contrast Checker indicated my blog has a contrast ratio of 9.24:1 which is well above the minimum recommendation of 4.5:1. I made the recommended changes and pushed my final commit.
Now my blog is ready for content! 🎉
Snags
I mentioned in step 3 that I ran into some snags while installing Jekyll. Here’s a quick breakdown of the problems and the solutions.
Problem 1: Meeting Ruby requirements for Jekyll
The Problem
Jekyll requires Ruby v. 3.1.3. I had Ruby v. 3.2.1.
The Mac OS specific Jekyll guide suggests using a Ruby package manager. Thankfully I already had chruby installed, which is (according the the guide) the easiest one to work with.
I also had Homebrew installed already so I skipped to step 2 of the guide.
I ran ruby-install ruby 3.1.3 and started getting errors…
1 warning and 1 error generated.
make[2]: *** [ossl_ts.o] Error 1
make[1]: *** [ext/openssl/all] Error 2
make: *** [build-ext] Error 2
!!! Compiling ruby 3.1.3 failed!
Unfortunately this error provides zero information about how to solve this issue. 😣
The Solution
Some Googling later, I finally came across this Github Discussions post where someone encountered the same error message. Thankfully it also provided a solution.
The post instructed to install OpenSSL 1.1 which ultimately solved my problem.
However…something about this didn’t sit right in my mind. If I’m currently using OpenSSL 3.1, wouldn’t 1.1 be less secure? Turns out it’s totally fine to use for compiling Ruby (3.1.3) and running Jekyll. However for other applications I’ll want to use OpenSSL 3.1.
I didn’t want to forget I made this change, so I added a function to my .zshrc file to remind me. Here’s the code I added, just in case you want to do the same:
# Check Ruby version and remind that the OpenSSL version is 1.1
function check_ruby_version_for_openssl_reminder() {
    if [[ "$(ruby -v)" == *3.2.1* ]]; then
        echo "⚠️  Reminder: You might need to check the OpenSSL version for Ruby 3.2.1. It may be set to 1.1."
    fi
}
Then I added this code below source /usr/local/opt/chruby/share/chruby/chruby.sh:
precmd() {
    check_ruby_version_for_openssl_reminder
}
Problem #2: Gems not installed…??
The Problem
The first time I ran the bundle exec jekyll serve command I saw this error message:
Could not find racc-1.7.1, bigdecimal-3.1.4, drb-2.1.1, mutex_m-0.1.2, unf_ext-0.0.8.2 in locally installed gems
Run `bundle install` to install missing gems.
I ran bundle install as the error suggested. A number of gems were installed (or so the terminal output led me to believe). I attempted to run bundle exec jekyll serve again. Same error. 🤔
The Solution
I had to add all of these gems to my Gemfile.
gem "racc", "~> 1.7.1"
gem "bigdecimal", "~> 3.1.4"
gem "drb", "~> 2.1.1"
gem "mutex_m", "~> 0.1.2"
gem "unf_ext", "~> 0.0.8.2"
Then I deleted the Gemfile.lock file using rm Gemfile.lock, followed by bundle install. This recreated the Gemfile.lock file.
For whatever reason I was still getting errors after this (maybe an issue with bundler?), so I simply installed the Gems individually: gem install <gem name>. This resolved the issue.
Adding a search icon in the navigation
-
Find a PNG of an icon you want to use. It’s best to stick to something most people will recognize, like a magnifying glass.
-
Add your icon to your “assets” folder. I added mine to a subfolder called “images”, but this is was more of a personal choice.
-
Copy the header.html file from the gem to the _includes folder in your local repo.
-
Add the following code below
<div class="trigger">, subbing in the name of your search page and the name + location of your icon:<a class="page-link" href="/name_of_search_page" role="link"> <img src="/assets/images/name_of_search_icon.png" class="svg-icon" alt="search"> </a> -
Add the following to your _config.yml file:
show_search: true
-
On my mac this file was located at /Users/myusername/.gem/ruby/3.1.3/gems/minima-2.5.1/_sass/ ↩